DESIGN PRINCIPLES FOR TACTILE GRAPHICS
Labels and Keys for Tactile Graphics
How is a tactile graphic labeled?
A tactile can be most quickly read when:
- the labels are placed directly on the tactile graphic, on (or in) the data being identified;
- space does not allow for some or all of the labels to be placed on the graphic, the labels are placed near the data with a lead line connecting the label to the data;
- the data in a graphic that requires many details is keyed using textures, and lettered or numbered symbols.
When is a key needed?
- A key is used to explain textures and other keyed information used to represent data on the tactile graphic.
- If the print image includes a key or legend, that information is incorporated into the braille key.
- Information may be keyed when there is not enough space available on the graphic for the entire label.
- Using full labels on the graphic when space is available and keying some of the information when space is not available is acceptable. The use of full labels and keyed labels should be categorized as much as possible. For example, in a tactile graphic of a map, the name of the countries may be full labels (spelled out on the map) and cities are shown on the map with lettered key symbols, explained in the key.
How are the symbols shown?
Texture symbols
All texture symbols are listed in the key first. Usually each group is shown in alphabetical order. Depending on the content, the symbols may be in order of appearance (such as a graph with two or more colored bars), or in order of importance (on a map, country being shown, then surrounding countries, then bodies of water).
The size of the texture sample is standardized to provide sufficient area for the reading finger to move across the texture, thus providing tactile feedback. The explanations (but not the textures) are brailled with a blank line between them since the texture sample is more than one braille line in height.
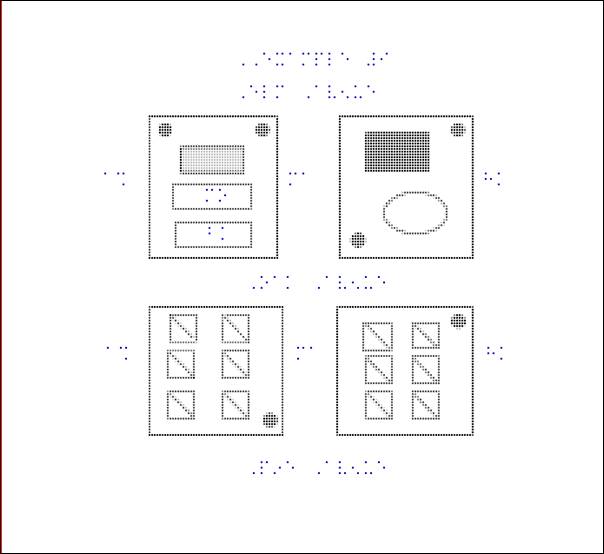
Each texture that represents an area is shown in the key with a 1 inch by ½ inch section of the texture.
Each texture that represents a line is shown in the same sized space, duplicating the texture of the line but not necessarily the direction the line as shown in the graphic.
Each point symbol is shown within the same sized space, and at the size shown in the graphic.
Note that the line and point symbol textures are centered vertically at dots 2, 5 of the braille cell.
The texture sample is placed in cells one through four, followed by a blank cell, then the explanation of the texture is written, using capitalization as shown in the graphic.
Below is an example of an area texture, line textures and a point symbol. (Full cells are shown on the first line in this example to demonstrate placement.)
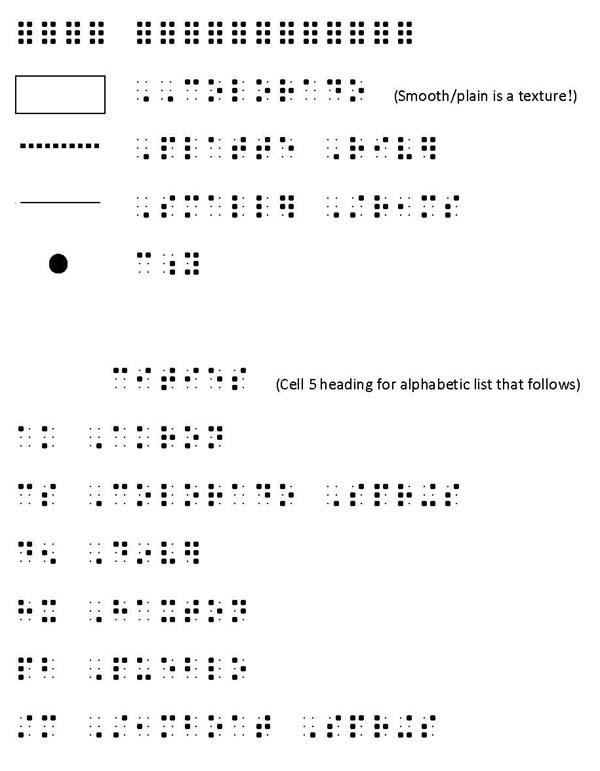
Alphabetic (lettered) key symbols
A two-cell symbol is used when a label must be “abbreviated”.
- Alphabetic order (usually)
- Contractions are used. *
- Letter combinations that correspond to short form words (in literary materials) may be used in graphics (e.g. fr for Franktown).
- Letters selected should help the reader easily identify or pronounce the word.
- No capitalization or punctuation is used in a two-cell symbol.*
- Two-cell symbols must include at least one braille character that contains dot 3 or dot 6.**
- Occasionally three-cell symbol s must be chosen when many of the labels begin with the same letters. Use of a mixture of two-cell and three-cell symbols for items in the same category is not recommended.
- Standardized abbreviations** are used when they already exist:
- EXCEPTIONS:
* Math and science graphics produced in Nemeth Code materials have slightly different requirements, based on the characters used in that code. Some braille characters become math symbols (ing becomes the addition symbol, to becomes the digit 6, st becomes the fraction line). In math, punctuation can be very important (e.g. A or a) to the operation or concept.
** Standardized abbreviations are used as they are listed. The requirement for braille characters containing dot 3 or 6 does not apply.(e.g. ca for California).Contractions are not used ( ar is used for Arkansas, not the ar contraction).
Numeric key symbols
Use a numeric key only when the print image uses a numbered key, or when the image has obvious steps in a sequence, such as a process to be followed in a specific order. A numeric key may be used for long titles/labels in diagrams such as a personnel organizational chart showing positions and supervisors for each department . The chart can be read from top to bottom, left to right and the numeric key followed rather easily. List in numeric order.
A random arrangement of numbers on a graphic provides very little organization for the reader. For each number encountered on the graphic, the reader must go to the key to determine the meaning or the label. Use numeric keys only when the content has a “flow” that would make sense to the reader.
Numeric key symbols are written with a number sign and upper cell (literary) numbers. No period is used after the number.
Format for key pages
The key must always be presented before the graphic so that the reader may begin to organize the information he will encounter in the graphic. If the key and the graphic will fit on the same page, place them together. If more room is needed, place the graphic on the right-hand page and the key on the facing left hand page. If the graphic will not be bound with text materials, use wide tape on the back of the two pages to keep the pages together and allow the pages to be folded at the taped edge.
If the print image has a title, include it before the key and again before the graphic if they are on facing pages. If a title does not exist, it is helpful to create a short, simple title so the reader knows the content of the graphic she is being asked to interpret. A title of “South America” is clear; “Map of South America” or “Graph of …” is not necessary.
A key is essentially a detailed transcriber’s note (TN). You may want to include a transcriber’s note or description summary at the beginning of the key to assist the reader in understanding the graphic. Begin the TN with the appropriate symbol (dot 6, dot 3) in cell 7 with runovers in cell 5. A closing TN symbol (same dots) is placed at the end of the key, after the last item.
In the paragraph above, description summary is mentioned. You are encouraged to spend some time looking at the tutorials for the Guidelines for Describing STEM Images from the National Center for Accessible Media in Boston. The guidelines are applicable to all subject areas and appropriate for all grade levels.
NCAM Guidelines NCAM recently completed a project to develop guidelines for description of images for Science, Technology, Engineering and Math (STEM )for digital talking books (DTB). The guidelines are very well done and not only apply to audio description but to production notes to accompany tactile graphics. Using a “drill down” method, a transcriber’s note can contain a very precise, multi-level explanation to support the reader in interpreting a tactile graphic. You may find that a description alone is a more appropriate way to present information from a print image to a braille reader.
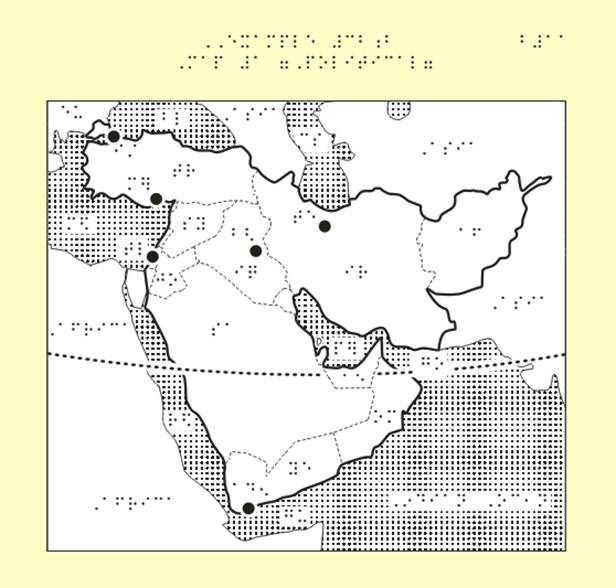
Examples
Two examples have been posted here to demonstrate layout of keys and use of labels. If you have additional questions about keys, email Lucia.
The following map and key of Southwest Asia is part of a multiple map series and was designed for production on microcapsule paper for an early draft of theBANA/CBA Guidelines and Standards for Tactile Graphics by Aquinas Pather, Tactile Graphics Specialist, T-Base Communications, Ottawa, Ontario. He has graciously given his permission for its use on this website.
<>Key: (Additional key pages not shown here)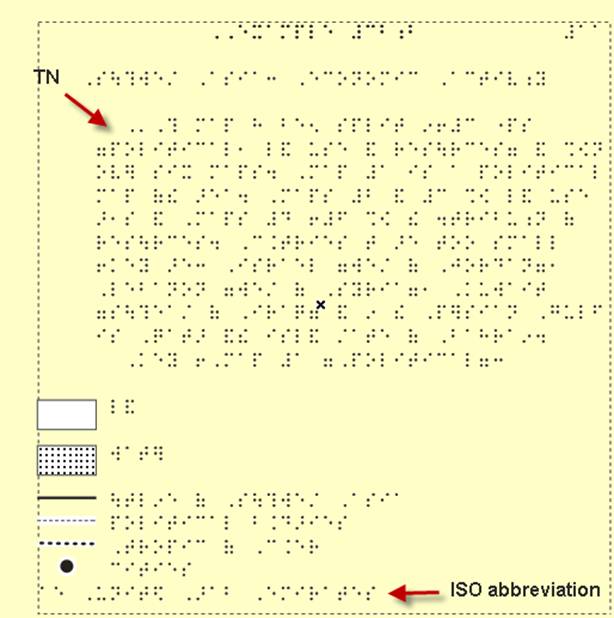
Map:
The following map and key of a neighborhood was designed by Lucia Hasty for production on a Tiger embosser for an early draft of the BANA/CBA Guidelines and Standards for Tactile Graphics.